I don’t know if you are old enough to remember but back in the 80s and 90s, popcorn ceilings were all the rage. For the longest time I thought they used to serve a purpose but only recently did I discover that they were purely done for aesthetic purposes. Nowadays they’re less popular and many are trying to remove and paint over them. But how exactly do you paint a ceiling after removing popcorn?!
Once the popcorn has been removed, you will have to scrap, clean and sand the surface down to make it smooth enough for a new paint layer. Once all of this is done you will have to prime the ceiling as well to bring forward any imperfections on the wall. Once all of this is done and the wall is dried, you can begin the painting procedure.
Popcorn ceilings were used to hide any imperfections in the wall. But it’s not a secret anymore that they tend to make a house look old and outdated nowadays.
So, if you are planning to repaint or renovate your home, then painting a popcorn ceiling can be quite tricky.
Let’s take a look at some of the ways you can get it done.
What Is The Fastest And Most Efficient Way To Remove Popcorn From The Ceiling?
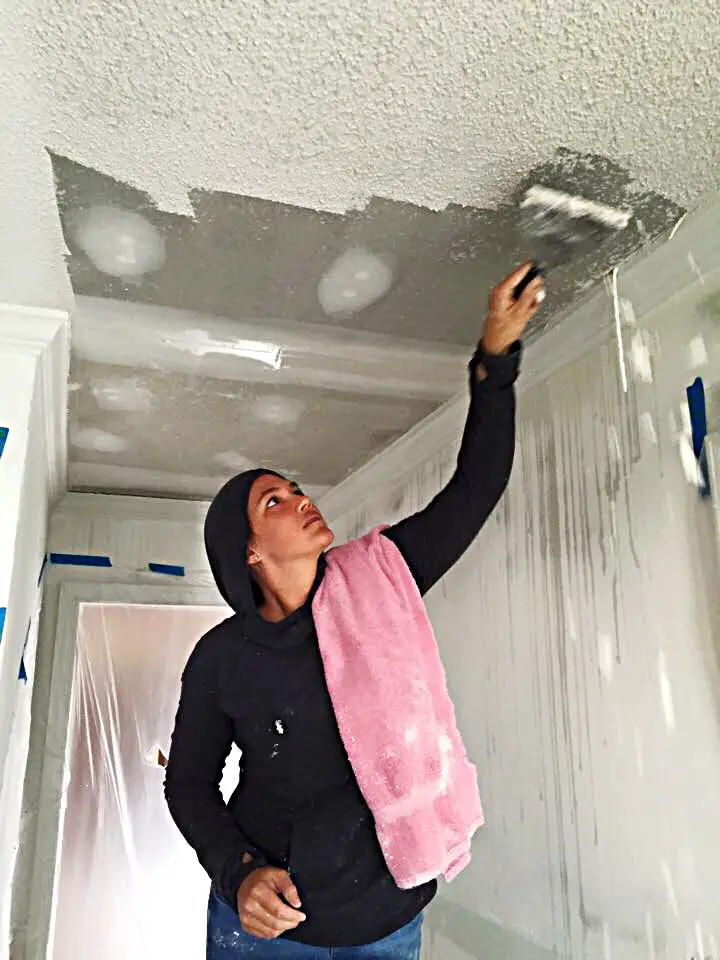
Before you go ahead and start painting the ceiling, you will have to remove the popcorn first. The process can seem a bit daunting but trust me it’s pretty simple. Make sure to keep all of the precautions in mind before you start the process. It will save your flooring and your furniture from being destroyed.
The first step before you start removing the popcorn is to cover all of the flooring and the furniture with a plastic tarp. I would not recommend that you go for a cloth covering as there might be some water dropping from the ceiling which will just create a mess. Plastic also has the advantage of being thrown in the dumpster once the whole process is done.
Once this is done, you can do a scrape test on the ceiling. This will tell you if there was a layer of paint on the ceiling or not. if there was paint then it will be a bit harder to scrape it off. If there is no paint then you can begin the scraping process right away. If there is paint then spray the ceiling with water once and let it absorb for about 10 minutes before beginning to scrape. This will make the popcorns a bit softer.
Some people recommend that you use a vinegar and water mixture on the ceiling before the scraping process. If water alone doesn’t do the job then you can go ahead and try this method but I don’t think this is necessary.
I would recommend to use a hand scraper to get this done. Start doing it one small area at a time, this way you can keep track of your progress easily and even take breaks in the middle. Another thing to keep in mind is to cover any electrical switches, light fixtures and ceiling fans or vents with plastic or newspaper.
After everything has been scraped off, use a sandpaper to make the surface smooth for painting. You will have to do this step properly so that there is no rough edges left.
What Equipment Will You Need For The Removal Process?
There are some basic equipment which you will need, most of it can be found in your house or in a nearby hardware shop.
Start off with a scraper, a simple hand scraper will do. You will also need a water sprayer, a simple one from your garden will do the job. The next thing which you will need is a sandpaper.
Keep in mind that these are the things which you will for the removal and smoothing process of the ceiling, I will get to the equipment which you will need for the painting process a bit later.
How To Prepare The Ceiling Before Painting?
Once all of the popcorn has been scraped off, there are some things you need to do before you start the painting. As mentioned before, use a sandpaper to smoothen the walls. If you skip this step then the wall will keep looking very rough.
Once the ceiling has been sanded, clean the wall with a wet cloth and wait to let it dry completely. This is necessary to clean the ceiling properly. Paint has a really hard time to stick and look good on a dirty surface so don’t skip this step.
The next step is priming the ceiling. Some people choose to skip this step, but I would recommend to do it. Priming will the walls much smoother and it will bring forward any cracks or irregularities left in the ceiling. You will also end up using less paint once the ceiling has been primed.
Does Your Ceiling Have Asbestos?
A lot of people believe that their popcorn ceilings have asbestos in them. This is true to some extent. To check if your ceiling has asbestos, the only thing to find out if when was ceiling constructed. If it was constructed before 1977 then it likely will have asbestos in it.
If the ceiling was constructed after 1977 then it likely doesn’t have any asbestos. This is because use of asbestos for ceilings was outlawed in the US after 1977.
I would recommend to get your ceiling tested if it was constructed before 1977 and especially if it hasn’t been renovated since then. If it does have asbestos, you will have to get it removed by a professional. This compound is known to cause life threating diseases.
How To Paint The Ceiling After Removing Popcorn?
Once the wall has been prepped and primed, you can simply go ahead and paint the ceiling with your favourite colour and using your preferred method. You can either use a brush or a roller. I would suggest that if you use a brush then only stroke in one direction. The same advice also goes for the roller.
Another tip would be to use a double coat to get the best results. Although if you have primed the ceiling then even one coat can do the job, but why not aim for the best results.
Conclusion..
The whole process of painting a popcorn ceiling is not at all complicated if you take all of the precautions beforehand.
Make sure you protect your flooring and the furniture in the room beforehand.
Also keep in mind to properly prepare and prime the ceiling before putting any paint on it. Hope this article helped you in your painting process.
Enjoyed this? Make sure to read these next:
How To Paint A Ceiling With Furniture In The Room (Everything You Need To Know!)
Which Direction To Paint A Ceiling? (Everything You Need To Know!)
Leave a Reply